Monday, October 24, 2011

The Garden of Earthly Delights

I spent last weekend in Miltenberg at the Garden of Earthly Delights event. It was an arts and sciences event where sca artisans showcased theid work and shared knowledge. I met many new and old fiends from all over Europe, learned new things and got to teach other people on the fine art of embroidery. Merry time was had by all. I sincerely recommend this event in the future for all who want to share knowledge on A&S and meet like minded artisans.

This was my table. I got to choose my table first from all available tables, and choose one in the corner where there was light due to a huge window. After I put my display up, someone moved three big piles of chairs right in front of me, so I was kind of hidden in the corner. But I had light to do some embroidery, so I didn't mind.

Katheryne's Pouch

I had the opportunity to give this present to Katheryne in person, when she visited the Garden of Earthly Delights event. That is the best part of this - giving the final product away and making someone happy. It was nice to have an excuse to give her something. ;)

Here is first a picture of the second finished embroidery (as always, click to have a closer look.):


A detail, I'm very happy about the way the pelican turned out. Unfortunately the shine of the white silk doesn't show well in pictures:


The finished thing, both sides:


Embroidered with silk on linen, split stitch and laid work. The upper part of the pouch as well as it's lining are silk. The cord is also made with silk. I run out of silk thread, so I could not make nicer finger loop braiding cords. Some tassels would have been nice as well, but it'll do without them. The size of the pouch is about 15x22cm

Thursday, October 13, 2011

Let's put the gear on reverse.

I had a discussion with a friend of mine about the reverse sides of embroideries. He was upset, that people were looking at the backsides of embroideries to determine the quality of work. His oppinion is, that one should not judge the backside, because surviving period embroideries usually have a very messy backside. I would like to discuss this.

What we can see, when we look at the backside of an embroidery? Sometimes it is "messy" with threads going here and there and knots sprinkled all over. Sometimes it is almost as neat as the right side of the work and no knots anywhere. Which one is better? And is it at all relevant?

The reverse side can tell a lot about the embroidery. How are the stitches really made? Is the work done systematically or has the embroiderer jumped from one corner to another? Is there excessive use of thread where no-one can see it (waste of money!)?

But is a messy backside a flaw? If the right side is beautiful, why should we be concerned about the backside when we know that medieval people were not? Of cource, if there is too much material on the backside of the work, it can make a difference on how the embroidery appears on the finished piece.

It all comes down to one question: Which is more important factor, authenticity or craftmanship? If authenticity is more important, we should indeed try to make the backsides of our embroideries messy! If craftmanship is considered to be the more important factor, we should also take a look at the backside to give us more information of the actual work process.

Is a neat backside better? In my oppinion it doesn't matter. I try to keep the backsides of my embroideries neat, but that is just the way I like it. And judging the work by it's backside? The judging criteria include many things. The quality of the work is only one of them. And the backside of an embroidery is only one little piece of the thing called the quality of work.

So by all means take a look at the backside of an embroidery, if it is not covered. But do not judge a work by the appearance of it's backside!

Monday, September 26, 2011

A preview for you

Here is a peek of what I'm doing at the moment. I had a very lazy summer, but now I'm working again. I'm embroidering a heraldic pouch. It'll be a present again, this time for Mistress/Mistress Katheryn Hebenstreitz. The first side is finished, and it bears her device. On the other side will be a pelican in piety surrounded with a laurel wreath. I decided to use my old style on this, because I wanted to have a work to calm my mood and make me happy. (Embroidery Zen...) Silk on linen, split stitch and laid work, 15x15cm.

What do you think? Should the stems be a little thicker?

Monday, September 12, 2011

Die Schultüte, the old German tradition

My daughter will go to school tomorrow. First day, first class. She is very excited, as you may well imagine. When we moved to Germany, I learned about an old German tradition of a big bag, cone shaped, that one gives to a child on their first school day - die Schultüte. It was traditionally filled with candy and toys to make the school taste sweet. Nowadays there is more school things and toys than candy, but the tradition lives well and good. So this immigrant mom made one for her own child. They are used only one day, so these bags are usually made of cardboard and paper. What do I do? Shall I cut and paste a DIY kit which are sold everywhere? Nope! I bought a brown cardboard cone, and embroidered a cover for it! Here are the pattern and the finished Schultüte.


Serious business, this photographing thing. (Picture taken with an empty schultüte, she'll get the filled one in the morning.)

I boldly ripped the pictures from free colouring page pictures that I found from the net. As the fabric I used an old baby bed linen, that gave me a ready made nice border on the open edge. The weave of the fabric was too tight for embroidery, so I had to fight to get the needle through with every stitch. Annoying. I used split stitch and running stitch with some old fake silk threads that I had once bought from a flea market. The unicorn and the fairy's tiaras are embroidered with fake gold surface couched with white sewing thread. Every fairy princess has her own colouring.

Monday, August 29, 2011

Proud Mama Vol II

My 5-years-old daughter finished her embroidery, which she started last November. Isn't it fine? :-D Embroidered on cotton with cotton and polyester threads and glas beads.


The other side. Surprizingly neat.


I'm such a proud mama at the moment. I need to first iron this and then frame it.

A present to my dear friend: A Sweete bag

I haven't posted much for a while, because I have more than one project on the making, and not many of them are ready. But this is. I wanted to give a present to a dear friend. So I spied what color her new Tudor garb will be, and made a sweete bag to match it. This is my inspiration picture:


Then my version of it. A little bit simpler, and the materials are not the same. This is emroidered on silk with fake gold, glas beads and silk thread. The same embroidery is on both sides of the bag.


A close-up of the emroidery:


And the side seam is covered with the same "gold" thread:


I'm very satisfied at the result. I had done beads only once before, and this was my first attempt on Elizabethan gold embroidery. I liked working on this one, and I'll propably do more of the same style later. It took me all together one week to make this.

Friday, April 15, 2011

I haz cookies


At the Crown Tourney I got some cookies. Here it is, isn't it beautiful? This scroll was made by Sayidda Amal binti Hamid and it is based on a 15th C MS from A Stitch Out of Time.

I also got a ring, that is close to a Lindquistringes ring, but not quite. A couple of pictures of the ring in here: Dragon's Den. My ring already lost one of it's eyes, because I managed to drop it and it hit the stone floor cracking the red eye into pieces. :-(

Wednesday, April 6, 2011

Drachenwald Archery Champion embroidery

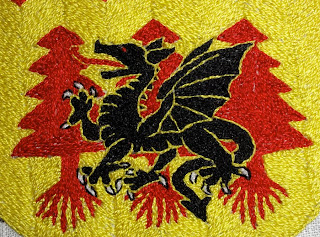
This was also a commission from Her Majesty Eleanora von Ratzeburg, Queen of Drachenwald, like the dancing champion badges I made before. This will be attached on a tabbard.

Embroidered on linen with cotton using split stitch.

The pencil is there to show you the scale of the work.

A detail.

I want to stop using cotton now. And I found a good source for silks, so I'll be using my stock pile of cottons to embroider less important things.

Monday, April 4, 2011

Spring Crown Tourney Feast IV - "Fish pie" and cabbage pastries

The third and last remove was "fish pie" and cabbage pastries. The pie was actually apple pie, but some people didn't even taste it because it was decorated with fish! Their loss. The cabbage pastries were the only thing that really was what it's name said, but instead of savory cabbage, they were sweet. Surprize!

(The picture is from a left over pie after transport, so the crust is a little damaged.)

The Fish pie:

Crust (American measurements, because I got the recipe from my friend):
2 cups flour
2/3 cups fat (butter or vegetable)
6-7 table spoons water (cold!)
Cut the fat and flour together, add water. Make the bottom from about 2/3 of the dough, the rest will make the lid.

Filling:
about 7dl apple puree (preferably without sugar, mine was self made)
cinnamon
cardamon
1 dl bread crumbs
(sugar, if you want it sweeter)

Mix the ingredients together, let it stand for at least 20 minutes. Make the crust, fill it and make the lid. Decorate with small fish made of rests of the dough. Bake in 180°C for about an hour or until golden.


The cabbage pastries:

Filling:
cabbage
sugar
cinnamon
cardamon
oil/fat

Cut the cabbage to small pieces, the thinner the better. Fry them in oil/fat on a frying pan until soft. Add sugar and spices to taste. Mix in some oil/fat if too dry.

Dough: (sorry about the Finnish way of measuring in decilitres)
Makes 32 pastries.
1/2l water
40g fresh yeast
1 tea spoon salt
1 1/2 dl (about 140g) sugar
50 g vegetable fat (or butter)
12 dl (about 720g) flour

Mix the yeast to luke warm water. Add salt and sugar and the flour gradually. Finally add the melted fat. Let the dough rise to double size, knead it well and make pastries with the filling. Bake at 200°C for about 20 minutes or until golden.

Spring Crown Tourney Feast III - "Sausages and parsley stew"

This is the second remove. The "parsley stew" was originally ment to be "parsley sauce", but because of a mishap there was not enough parsley on them to cover the dish and I changed the name just before serving. Unfortunately I don't have any pictures of it.

But first the "sausages":
This was one of the two dishes that caused most confusion, and with a good reason!


These sausages are made of rice pudding in natural sausage casing. The recipe makes about 100 sausages!

2l water
500g rice (porridge type)
3 eggs
1 table spoon cinnamon (fine powder)
2 table spoons cardamon (coarce powder)
1 1/2 dl sugar
sausage casings

Cook the rice slowly in the water for about 30 min (make sure that it won't boil dry), let it stand under a lid for 10 minutes. Add the spices and let it cool down. Add the eggs and mix well.
Fill the rice in sausage casings to make sausages. Tie the sausages with a string, because just rolling them won't be enough since they will not be as firm as real sausages. Cook the sausages carefully in simmering water for 3-4 minutes, be sure to prick them with a needle before and during the cooking. They will burst easily, be careful.

I had my sausages in the freezer for three weeks before the event, and that seemed to do them good. They were much firmer after they were defrosted than before freezing. I warmed them in warm water (70°C), be careful not to break them again.

Here's a picture to show you how real they looked like. The ones on the right are real bratwurst (uncooked) and the ones on the left are my "sausages". No wonder that people though they were real! The texture can annoy some people, but they taste good.


A "making of" picture. It took some time, since I did not have a machine to use, only the old fashioned meat grinder.


"The Parsley stew"
This is my version of a recipe in Platina's De Honesta Voluptate et Valetudine, Book VI, recipe 16.

Chicken thighs
white wine vinegar
water
salt
sugar
pepper
ginger
parsley

Cut the thighs in halves at the joint. Boil the meat in 2/3 vinegar and 1/3 water with some salt until done, takes about 30 minutes. Put the meat on a serving dish with some of the cooking liquid and sprinkle the spices on top. There should be enough parsley to hide the meat, something we did not have at the event because of a mistake.

Most of the people really liked the chicken. This was the most asked for recipe after the feast.

Spring Crown Tourney Feast II - "The Apples and fruit puree"

Here is the recipe for the first remove. I'm sorry if the recipes are vague. I lost my recipe notes two days before the feast and I had to cook by memory and taste, not that I would mind doing it. And it is very period, don't you think?

"Apples"
This recipe is a much changed version of a recipe I found in "Take a Thousand Eggs or More, vol II" (This is the only dish I had a precise recipe for, because I sent it to Alyna for them to do the meat balls before the event.)

1kg (2.2 lb) ground beef
100g (3.5 oz) dates, finely chopped
1/2 tea spoon cloves
1 tea spoon black pepper
1 tea spoon ginger
1 tea spoon cinnamon
1/2 tea spoon salt

Mix all together and make balls. Boil them in salted water for about 12-15 minutes, or until done.

The dough:
I don't have an exact amount of dough you need, because I made a lot of it in three batches and it also depends on how thick coating you make. You can start with this amount, it should be enough for the meatballs you get with the recipe above:

2 bunches of parsley
8 egg whites or 5 whole eggs (the color will be better, if you use whites only)
ginger
flour

Chop and grind the parsley very fine and squeeze it to get the green juice. (Save the rests for the chicken dish!) There will not be much of it, but it will give a lot of color. Mix the ginger with some of the flour and mix that with the eggs. Add the parsley juice and then keep adding flour until you get a dough that can be molded around the meat balls with floury hands. Cover the meat balls with the dough and boil them in water. It is best to put the balls in the pot carefully with a ladle and stir it often. The balls tend to stick to the bottom at first, but if you detach them with your ladle, they don't do that anymore during the cooking. They are ready when they raise on the surface. If your dough is very thick, it might need little more time to cook.

The meat "apples" can then be kept cool and warmed up before serving. They are even better the next day when the taste has had time to spread through the dough.

And here is what they really are...


The orange thing in the picture is my "Fruit puree":

Carrots, parsnips and rutabaga, more carrots than others.
salt
pepper
cloves
ginger
cinnamon

Peel the vegetables and cut them to pieces. Cook them in water until soft, drain. Puree the vegetables. Add spices to taste. Serve hot.

People seemed to like these. Some of them did not like the dough, though.

Spring Crown Tourney Feast I

Last weekend I worked at the Crown Tourney in Turmstadt as the head cook. I had stressed about it for some time, but everything went well and according to my plans. I could enjoy the event and the cooking, and I got back some of the joy of cooking that I had lost a little while ago.

The theme was April's Fool, so I planned a feast of subtleties, or foods that look like something else than what they are. This was a risk, because a lot of people are picky of strange foods, but I was willing to risk it. The feast was supposed to be fun and surprizing and the food simple, tasty and plentiful.

My kitchen facilities were somewhat limited, so I had to make many things in advance, which in the end was very effective and gave me even time to rest on Saturday, something that is very unusual for the head cook. In this I also got help from a couple of marvelous people, Magdelene, who took care of the traveler's fare, breakfasts and lunch despite being busy with the tourney, and Alyna and Silvein, who were willing to make 300 meat balls and get them to the site on time. I can not thank them enough. Many more people helped me too, you know who you are, and I'm very thankful for your help.

I'm not the one to cook from precise recipes, that is why I like medieval cooking. As I know the medieval theory behind their recipes, I think that I can make my own medieval recipes without them losing being period enough. The theme and limited facilities that I had with this feast required me to tweak some of the existing resipes or invent new ones.

I'll post the recipes here one by one, but I would like to get feed back of the whole feast from those of my readers who were there. What went well and - most importantly - what could have been better?

Monday, February 21, 2011

Old work: The Tablero game board

I was asked to post about this, so here I go. This is my first SCA embroidery, and about fourth embroidery in my life, if one does not count that monstrosity from fifth grade at elementary school. I have a vague memory of making this around 1999.

It was a dark and stormy night, like always, when I got a sudden idea of after a couple of mundane cross stitch embroideries to try a stitch I had seen pictures of years ago. I grabbed a piece of cloth and some thread that I had and started stitching. I don't remember how long it took to make this. I tried many different stitches out of my head, no sources or anything, and added pieces of fabric to it as I went stitching. After it was finished, I tried to write a documentation for it, with mixed results.

Cotton on linen, at least 8 different stitches, mainly satin stitch and bokhara couching. 32x32cm

The whole game board with dice. My husband made the dice from rose wood.

A close up near the centre.

A detail from one of the corners. There are seams under the light brown embroidery.

The back side. Quite neat, if I say so myself. There is not a single knot in this work. Now I need a lot of coins to start playing! There is a drinking game version of the game, so I have 7 neat little cups made out of rose wood to finish this set.

I have entered this in Arts and Sciences competitions a couple of times. I have got critique because of it being an embroidered game board, when those were supposed to be made out of wood, and because of the lack of knots (!).

Friday, February 18, 2011

Fit for champions

This is a commission from Her Majesty Eleanora von Ratzeburg, Queen of Drachenwald. These Dancing champion badges will be attached to arm bands. They are both 10cm across and embroidered on linen with silk thread using split stitch.

Both still on the frame. (My new frame that I got from Aarnimetsä. I love it!)

A close-up of one of the dragons.

I could not keep myself from playing with the split stitch a little. It reflects light differently if worked in different angles, and it produces a subtle shading if looked from the side.

Now I'll give these to Lady Magdelena Grace Vane, who will finish the arm bands. New pictures when that is done.

Thursday, January 20, 2011

My New Eye-Dazzling Silk Tent

I'm slowly getting started with my new "garberobe". Here is something I finished yesterday after some stitching frenzy.

First a basic under layer. Wool. The pattern is Herjolfsnes nr 39 with lacing added to the front. The sleeves are done without gussets, a mistake I will not repeat. The next one I'll make shall be more tight-fitting. This one doesn't give any support for the bust.


Then the outer layer. Machine embroidered silk, linen lining. The pattern is somewhat similar to the one above, except for the sleeves, of course. I had to cut it differently to get the embroideries parallel to each other, though. I was so careful not to make it too small, that it became way too big and is like a tent. It's too wide under the arms and at the back. I wonder how could I best fix it. Do I have to open it up and take it in at the seams or would some lacing on the sides be enough? Would that even be period for an outer layer? Or should I just get a pretty belt?


Here you can see the sleeves a little bit better. The veil is a fast fix for the pictures, usually I wear a little more elaborate one with a chin piece.

This must be the most comfortable garb I have ever had. Perhaps I shall keep it as it is, the tent and all?

Wednesday, January 12, 2011

A Christmas present

I wanted to make a christmas present for a friend of mine. He really likes the drum playing skeleton by Hans Holbein (see for example this page, detail in here.), so I embroidered him a needle roll. (He makes awesome garb, by the way.)

Cotton on linen with split stitch and whatever stitch for detail.


The other side, where you keep your needles, is wool, there is a couple of layers of it to make it thicker.


The strings ended up being a little bit too short, but one can still tie it up, so no harm done. He recieved his gift and liked it. And I liked making it. It was a new experience. I've never embroidered line drawings this fine before and the details made it hard to transfer the design on the fabric, but the result looks much better than I had hoped for. This took all together two days to make.